Hey friends,?How are you all? This is another one of my food blogs. I made egg biryani last week and it was awesome. Actually, both my parents?are vegetarians and they don’t allow cooking chicken or any meat at home. But I somehow convinced my parents to cook egg biryani at the cost of making them a vegetable biryani separately. It was super fun preparing the recipe and making both these different taste foods. Also, I used my new prestige flat base “kadhai” to make the biryani and it helped me a lot in adding that extra taste to it. I prepared the birista for garnish and then made it step by step.

Table of Contents
HERE GOES THE RECIPE
Ingredients

- Basmati rice
- Butter or ghee
- Eggs
- Curd
- Onion
- Tomato
- Green Coriander
- Bay leaf
- Garlic
- Ginger
- Cashew
- Soya chunks
- Green chillies
- Bell pepper
- Black pepper
- Cloves
- Cardamom
- Cinnamon
- Black cardamom
- Salt
- Water
- Red chilli powder
- Cumin powder
- Turmeric powder
- Coriander powder
- Garam masala
 ??
??
Use Of Raw Spices
As you might have noticed in the ingredients list that I used both raw ground spice and powdered ground spice mix. Well, the thing is that raw spice gives aroma and extra flavour to the dish whereas the powdered spice acts as a compliment to give that hot flavour. This hot flavour strikes the throat part mainly whereas the raw spices aroma fills up your nose and palate.
Preparation
So the first thing I did was keeping the eggs to hard boil and kept the rice soaked in water for half an hour. Then I finely sliced one big onion to prepare the birista. For those who don’t know what a birista is then let me tell you that birista is golden deep fried onion slices that are added as a garnish to biryani. Birista on top of biryani is like the cherry on top of a cake. So if your biryani is always incomplete without a crispy golden birista. For birista you need to deep fry the onion slices at medium flame for as long as you get the light golden colour. Add salt while frying to the oil as salt acts as a conductor for heat and saves the onion from getting burnt easily. I also fried some cashew nuts in butter to add as a second garnish to the biryani.
Recipe
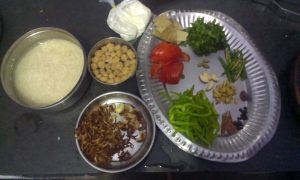
Now starting with the main dish. I made a ginger and garlic paste. As you can see the rest of my preparations in the picture and also my brand new prestige-heavy base non-stick kadhai.
Start by putting four tablespoon butter or ghee into the kadhai. Add two bay leaves, six cardamoms, four cloves, one black cardamom, one cinnamon stick and let them all fry a little on medium flame. Now add sliced fresh onions (not the birista) to the kadhai along with chilli juliennes. After the onion gets partially fried add coriander, tomato, bell pepper, soya chunks and cook all these vegetables well.


Put in the powdered spices as one spoon chilli powder, a 3/4th spoon of turmeric, 2 big spoons of coriander powder and a 1/4th spoon of garam masala. Now put the heat to low and add 4 tablespoons of curd and mix well. Add the soaked rice to the mixture and then add water just enough to drown the rice. If you took one glass of rice then add one and a half glass of water to it. Add salt to taste and put the lid on just like I did.


I didn’t use the authentic “dumm cooking” in which the rice or biryani is cooked by tightly sealing the lid with a wheat dough. This is done to prevent all the vapours from escaping the vessel and this cooking technique is actually very important if you are making a biryani. I was making biryani for the first time and I learned that this technique has to be taken necessarily if you are making biryani. So make a dough and seal the lid. On a mid-low flame let the biryani cook for 20 minutes.
Put the heat off and do not open the lid yet, let the dish rest for 10 minutes more and then open it. Garnish with scrambled or boiled eggs to make it egg biryani or just a sober garnish of birista and cashew to make it a vegetable biryani.?
NOTE: biryani has layers of white rice and saffron coloured rice which I couldn’t make as this step takes more time. you can add this step by pre-cooking the rice about 70 percent and then adding it to the vessel in layers of white rice and saffron added rice.
 ?
?
Your biryani is ready to eat and lick your fingers off. It was super tasty and especially the crunchy cashews were amazing.?
You can shop for the ingredient here,
Be happy
Be my aficionado

